
Handling RMAs On Mobile Devices in Dynamics AX 2012 R3
- Mar 22, 2017
- 3 min read
Microsoft has done it again! Along with the delivery of Dynamics AX 2012 R3 and the numerous functionality bonuses, the use of RF devices to process Return Material Adjustments/Authorizations entered the scene.
Once the system setup has been completed in AX 2012 R3, the RMA process on the RF device becomes a few easy scans and clicks. None of these Warehouse or RF requirements are particularly complex. Here is a quick list of what should not be overlooked:
Create a Work Class specific to the Return “work”.
Create a Work Template specific for the Return “work”.
Create any new Inventory Status codes necessary to facilitate the handling strategy of the returns, if needed.
Setup a Disposition code (or codes, if multiple are necessary). Each Disposition code will need to be linked to an Inventory Status and the Work Template from the previous setup steps.
Create a Location Directive to instruct the RF through the process.
Create the RF Menu Item and add it to the Mobile device menu.
After a return order is created in AX, using the RF device, the return can be processed by opening the RMA menu item, entering or scanning the RMA ID, scanning the item, and entering the quantity. A disposition code is required. The work details have been created and will be displayed on the RF device as defined in the work template.
Setup Requirements
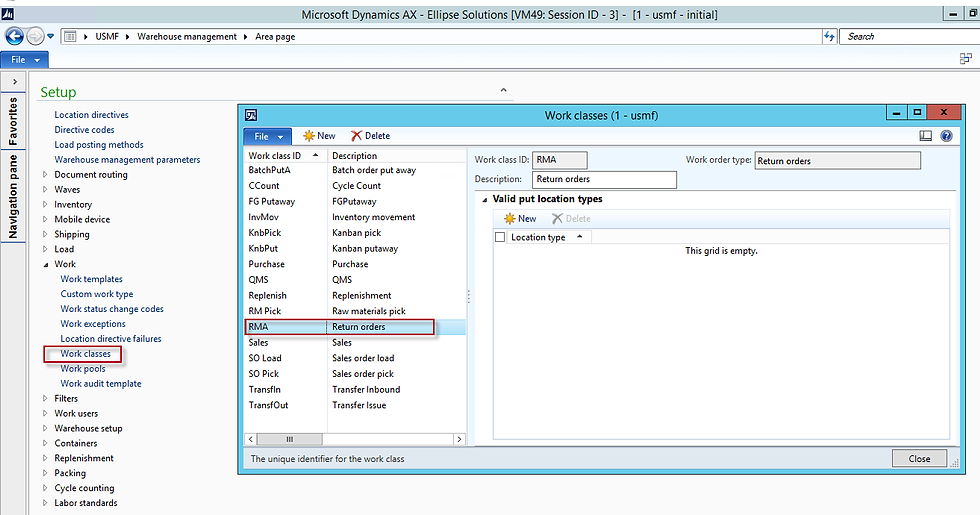
1. Work Class Creation
Navigate to Warehouse > Setup > Work > Work Classes
In this example, refer to RMA:
2. Work Template
Navigate to Warehouse > Work > Work Templates
The work order type is “return orders”
Select “New”
Move to the lower section of the form and select “New”
Create the work steps necessary to complete the process, marking the steps mandatory or not. Reference the Work Class ID created earlier.
In this example, refer to RMA:

3. Inventory Status
Navigate to Warehouse Management > Setup > Inventory > Inventory Status
Complete this step only if an additional inventory status is necessary

4. Disposition Code
Navigate to Warehouse Management > Mobile Device > Disposition Codes
Select “new” and fill in the name, inventory status, work template code, and return disposition code
In this example, refer to RMA Credit and RMA Scrap:

5. Location Directive
Navigate to Warehouse Management > Setup > Location Directives
The work order type is “return orders”
Select “New”
Associate the Disposition Code previously created to the information for the directive and complete the directive
In this example, refer to RMA:

6. RF Menu Item
Navigate to Warehouse Management > Setup > Mobile device > Mobile Device menu items
Select “New” and assign it a name and title with a mode of “work”

Close the form
Select Mobile Device Menu, and locate the new menu item under Available menus and menu items
Click on it to highlight the selection
Click the “<” which will add it to the RF device menu.

Processing the RMA on the RF
On the RF Device, select the RMA Process menu item
Enter the RMA#
Enter the Item, quantity and disposition code
Review the Work details and follow the work that was created using the proper location directive and work template
Have other Microsoft Dynamics AX Inquires or needs? Visit our Help Desk for AX page to see how our experts can help!
For more information please contact Ellipse Solutions at info@ellipsesolutions.com or by calling our corporate office at (937) 312-1547.


Comments